This blog will get you started with C# by introducing a few very simple programs. Here are the objectives of this lesson:
- Getting Started with C#
- Passing arguments from Command-Line:
- Interacting via the Command-Line
- Data Types
- Decision Making (Control Statements):
- Control Statements – Loops
Getting Started with C#
- Understand the basic structure of a C# program.
- Obtain a basic understanding of what a " Namespace " is.
- Obtain a basic understanding of what a " Class" is.
- Learn what a "Main" method does.
- Learn how to obtain command-line input.
- Learn about console input/output (I/O).
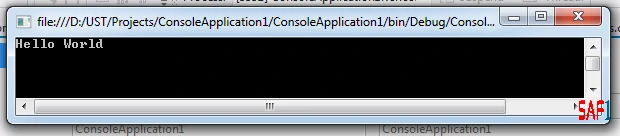
To explain the above points, let’s start by a "Hello world" program to know the basic elements that all C# executable programs have.

This program has some primary elements, a namespace declaration, a class , and a Main method.
- Namespaces contain groups of code that can be called by C# programs. With the using System ; declaration, we are telling the program that it can reference the code in the System namespace without pre-pending the word System to every reference.
- The Class declaration, class HelloWorld , contains the data and method definitions that your program uses to execute. A class is one of a few different types of elements your program can use to describe objects, such as structs , interfaces , delegates , ,, etc.
- The method name, Main , is reserved for the starting point of a program. Main is often called the "entry point" and if you ever receive a compiler error message saying that it can't find the entry point, it means that you tried to compile an executable program without a Main
Note: The screen will run and close quickly when launching this program from Visual Studio .NET. To prevent this, add the following code as the last line in the Main method:
Console.ReadLine();
The output of this program may be:
--==--==--==--==--==--==--==--==--==--==--==--==--==--==--==--==--==--==--==--==--==
Passing arguments from Command-Line:
If you are using an IDE, like Visual Studio, double-click the Properties in the solution explorer, click the Debug tab, and add your arguments into the Command Line Arguments separated by a space.
If you are using the console "Dos" then add your arguments after the name of the executed program. For example: SendingArgs Wellcome into C# World
Where SendingArgs is the name of the progam and ( Wellcome into C# World ) are the passed arguments.
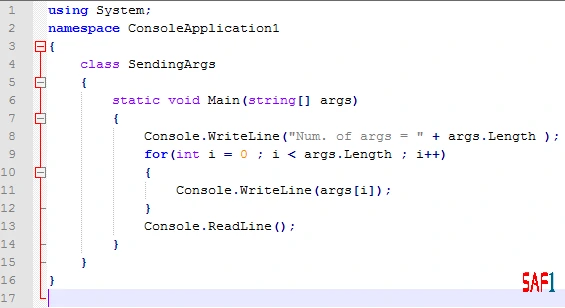
At Line 8 : Print the number of passed arguments by calling the arguments' array , args , associated with the method Length which returns the length of the array.
Lines 9 to 12: We used a for-loop to access all elements of the args array and print them one by one.
Line 13: It's just used to freeze the screen.
The output of this program may be:

--==--==--==--==--==--==--==--==--==--==--==--==--==--==--==--==--==--==--==--==--==
Interacting via the Command-Line
We can easily use the Command-Line to print out or in some messages. For example, we will prompt the users to enter some input, they type something in and press the Enter key, and we read their inputs and take some action.

To do so, we will use the ReadLine and WriteLine methods.
Line 9: To print out a message to the user on the Command-Line we used the WriteLine method from the class Console.
Line 10: To read in a message from the user from the Command-Line we used the ReadLine method from the class Console. It returns the message as a string value, so we put it into the string variable s .
Line 11: Finally, we print out another message containing the word Hello and the message entered by the user.
The output of this program may be:

--==--==--==--==--==--==--==--==--==--==--==--==--==--==--==--==--==--==--==--==--==
Write a Program to Display the Size of some Data Types:

The sizeof returns the size of data type in bytes.
Note: In this program it's clearly that we didn't use the "using" keyword to call the namespace "System", instead, we called the WriteLine method by mentioning its class Console and this class namespace System.
Namespace.Class.Method->System.Console.WriteLine
The output of this program may be:

--==--==--==--==--==--==--==--==--==--==--==--==--==--==--==--==--==--==--==--==--==
Decision Making (Control Statements):
1. Decision Making (if-else statements):
An if statement allows you to take different paths of logic, depending on a given condition. When the condition evaluates to a boolean true , a block of code for that true condition will execute. You have the option of a single if statement, multiple else if statements, and an optional else statement.

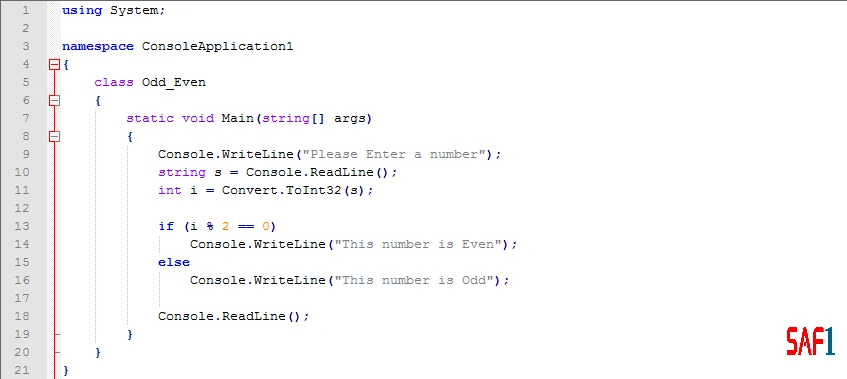
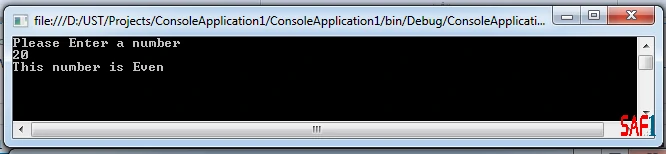
Write a program that asks the user to enter a number and then determines if this number is even or odd.
Explanation:
Line 9: As we mentioned before the WriteLine method print out a message into the Command-Line.
Line 10: The ReadLine(); method reads a line from the Command-Line into the variable s.
Line 11: The Convert class contains numerous methods that convert one base data type to another base data type. This class has the method ToInt32 which in this program will convert the data type "s" of type string to another data type " i" of type integer, so that we can use "i" in our condition.
Line 13 to 16: To know whether the entered number is even or odd, we will use The if – else statement. It begins with if and its boolean expression between parenthesis. This boolean expression must evaluate to a true or false value. In this case, we are checking the (user's input % 2 if it is equals 0). If this expression evaluates to true , then number is even, so we print out a message that this number is even, but if the boolean expression evaluates to false , we print out a message that this number is odd.
The output of this program may be:
--==--==--==--==--==--==--==--==--==--==--==--==--==--==--==--==--==--==--==--==--==
2. Decision Making( Multi if-else statements):
To make sure that you understand the syntax of if-else statements let's write a program that asks the user to enter a student's degree and then determines his/her grade.
Note: There are many possibilities for the student's Grade and in our example we will use the basic grade of (A,B,C,D and F).

Explanation:
Line 9 to 11: We will print out a message to the user to enter a degree from the Command-Line, read that degree, and finally convert it to integer.
Line 13 to 14: We will check the entered degree if it's (greater than or equal to 90) and (less than or equal to 100). If this expression evaluates to true, then the student's grade is "A", so we will print out the message "Grade is : A".
Line 15 to 20: if the first expression doesn't evaluate to true, then the execution of the program will flow to the second expression and check it. If the entered degree is (greater than or equal to 80) and (less than or equal to 89). If this expression evaluates to true, then the student's grade is "B", so we will print out the message "Grade is : B".
As previously, If the second expression doesn't evaluate to true , then the execution will move to the next expressions ( "C" and "D").
Line 21 to 22: If none of the previous expressions evaluate to true, then the program will move to the last expression, the else statement, this expression comes as the last option we have and we will print out the message "Grade is : F".
--==--==--==--==--==--==--==--==--==--==--==--==--==--==--==--==--==--==--==--==--==
3. Decision Making (Switch Statement):
Another form of selection statement is the switch statement, which executes a set of logic depending on the value of a given parameter. The types of the values a switch statement operates on can be booleans, integers, chars, strings… etc.

The case block follows the switch expression, where one or more choices are evaluated for a possible match with the switch expression. Each choice is labeled with the case keyword, followed by an example that is of the same data type as the switch expression and followed by a colon (:). For example we may have case 1: , case 2: , and case 3: . When the result evaluated in the switch expression matches one of these choices, the statements immediately following the matching choice are executed, up to and including a branching statement, which could be either a break , continue , goto , return , or throw statement.
Break->Leaves the switch block
Continue->Leaves the switch block, skips remaining logic in enclosing loop, and goes back to loop condition to determine if loop should be executed again from the beginning.
Each case label must end with a branching statement which is normally the break statement. The break statement will cause the program to exit the switch statement and begin execution with the next statement after the switch block.
Finally, we may include a default choice following all other choices. If none of the other choices match, then the default choice is taken and its statements are executed. Although using of the default choice is optional, I highly recommend that you always include it. This will help catch unforeseen circumstances and make your programs more reliable.
To understand the syntax of Switch statement, let's write a program that asks the user to enter a number from 1 to 3 and then write out its literal value.

Explanation:
Line 8 to 10: We will ask the user to enter a number from 1 to 3 and then convert that number from string to int .
Line 12: This is the beginning of the switch statement. We will evaluate the entered number to its cases.
Line 14 to 19: These are the cases of switch. If one of them matches the switch expression, the statements immediately following the matching choice are executed until the break force the program to exit the switch statement and begin execution with the next statement after the switch block.
Line 20 to 21: This is the default choice. If none of the above choices match, then the default choice is taken and its statements are executed.
The output of this program may be:

--==--==--==--==--==--==--==--==--==--==--==--==--==--==--==--==--==--==--==--==--==
Control Statements – Loops
In this lab you will learn the proper way to execute iterative logic with the various C# looping statements. My goal is to meet the following objectives:
- Learn the while loop.
- Learn the do-while loop.
- Learn the for loop.
- Learn the difference between break and continue control statements .
There may be a situation, when you need to execute a block of code several numbers of times. In general, statements are executed sequentially: The first statement in a function is executed first, followed by the second, and so on.
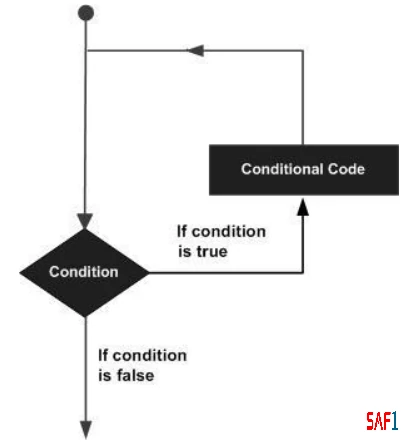
Programming languages provide various control structures that allow for more complicated execution paths. A loop statement allows us to execute a statement or group of statements multiple times. The figure, in the right side, is the general from of a loop statement in most of the programming languages.
1. Control Statements (The while Loop):
A while loop checks a condition and then continues to execute a block of code as long as the condition evaluates to a boolean value of true .
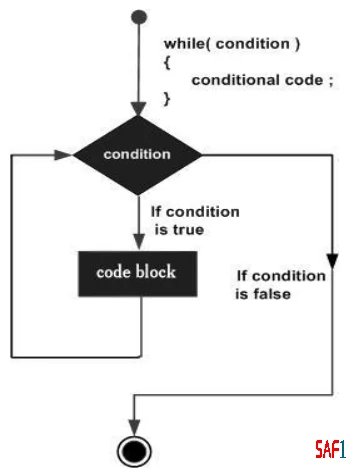
Its syntax is as follows:
while (boolean expression)
{ statements }
- The statements can be any valid C# statements.
- The boolean expression is evaluated before any code in the following block has executed.
- When the boolean expression evaluates to true , the statements will execute.
- Once the statements have executed, control returns to the beginning of the while loop to check the boolean expression again.
- When the boolean expression evaluates to false , the while loop statements are skipped and execution begins after the closing brace of that block of code.
Note: Before entering the loop, ensure that variables evaluated in the loop condition are set to an initial state . During execution, make sure you update variables associated with the boolean expression so that the loop will end when you want it to.
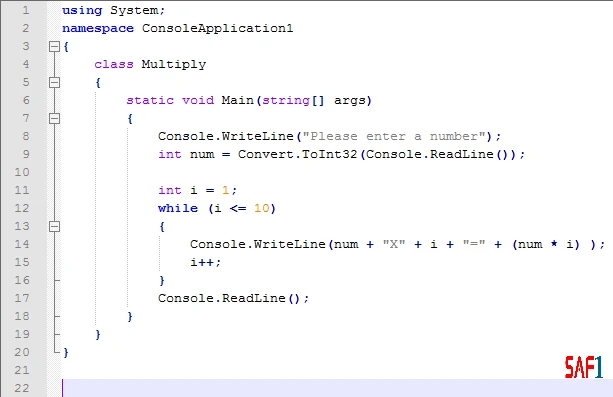
Ex: Write a program that asks the user to enter a number and then displays the output of the multiplication of this number by numbers from 1 to 10.
Explanation:
Line 11: We initialized the variable "i" to 1, so that our program starts the multiplication of the entered number by 1.
Line 12: This line begins with the keyword while , followed by a boolean expression. All control statements use boolean expressions as their condition for entering or continuing the loop. This means that the expression must evaluate to either a true or false value. In this case we are checking the "i" variable to see if it is less than or equal (<=) 10. When the boolean expression evaluates to true , the block immediately following the boolean expression will be executed. In this example the while block will be executed 10 times until the boolean expression evaluates to false and ends the while loop.
Line 14: This line is within the while block and it will print out the outputs.
Console.WriteLine(num + "X" + i + "=" + (num * i) );
We start it by printing the entered number "num" , followed by an "X" symbol, followed by the loop initialized variable, followed by an "=" symbol, and finally we print the result of the multiplication ( num * i ).
Line 15: This line is very important because it updates the value associated with the initialized variable, so that the loop will end when the condition goes wrong.
Once the statements in the while block have executed, the boolean expression is evaluated again. This sequence will continue until the boolean expression evaluates to false . Once the boolean expression is evaluated as false , program control will jump to the first statement following the while block.
The output of this program may be:

--==--==--==--==--==--==--==--==--==--==--==--==--==--==--==--==--==--==--==--==--==
2. Control Statements (do-while Loop):
A do - while loop is similar to the while loop, except that it checks its condition at the end of the loop. This means that the do-while loop is guaranteed to execute at least one time. On the other hand, a while loop evaluates its boolean expression at the beginning and there is generally no guarantee that the statements inside the loop will be executed, unless you program the code to explicitly do so.

One reason you may want to use a do-while loop instead of a while loop is to present a message or menu and then retrieve input from a user.
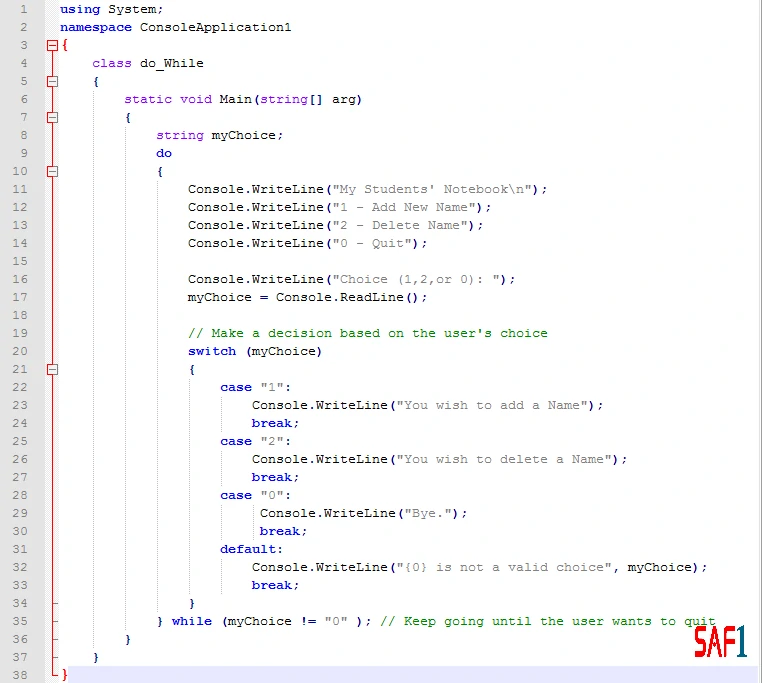
Ex: write a program that displays some options as a menu to the user using the do-while loop.
Explanation:
Line 11 to 14: These lines display some possible options to the user.
Line 16 to 17: These lines ask the user to enter his/her choice and then read the choice into the variable "myChoice".
Line 20 to 34: This is the switch statement which will respond to the user's entered value and display a proper message.
Line 35: This line contains the do-while condition. The program will keep executing until the user enters "0".
--==--==--==--==--==--==--==--==--==--==--==--==--==--==--==--==--==--==--==--==--==
3. Control Statements (for Loop):
A for loop works like a while loop, except that the syntax of the for loop includes initialization and condition modification. for loops are appropriate when we know exactly how many times we want to perform the statements within the loop.
The contents within the for loop parentheses hold three sections separated by semicolons

(
{
Once the initializer list has been evaluated, the for loop gives control to its second section, the boolean expression . There is only one boolean expression , but it can be as complicated as we like as long as the result evaluates to true or false .
When the boolean expression evaluates to true , the statements within the curly braces of the for loop are executed. After executing for loop statements, control moves to the top of loop and executes the iterator list , which is normally used to increment or decrement a counter. The iterator list can contain a comma separated list of statements, but is generally only one statement.
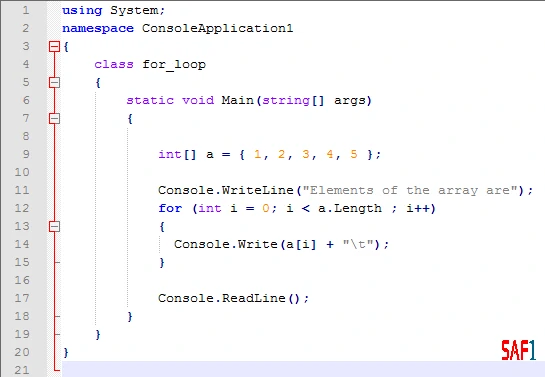
Ex: Write a program that displays the elements of an array using the for loop.
Explanation:
Line 9: This line defines an array "a" with five initial elements 1,2,3,4, and 5.
Line 12: This line has the for loop parameters. The initializer list is set by the variable i to 0, so the loop will start from zero. The boolean expression is set to as long as the "i" is less than the length of the array (0 < 5). The iterator list is set to increase the variable " i" each time by 1.
Line 13 to 15: These lines are the body of the for loop. The loop body will be executed five times before the boolean expression evaluates to false and ends the loop.
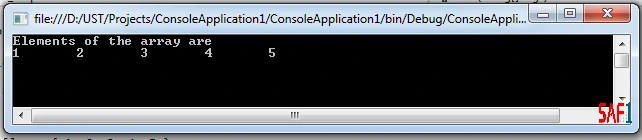
The output of this program may be:
--==--==--==--==--==--==--==--==--==--==--==--==--==--==--==--==--==--==--==--==--==
4. Control Statements (Break and Continue):
Break statement: Terminates the loop statement and transfers execution to the statement immediately following the loop.
Continue Statement: Causes the loop to skip the remainder of its body and immediately retest its condition prior to reiterating.

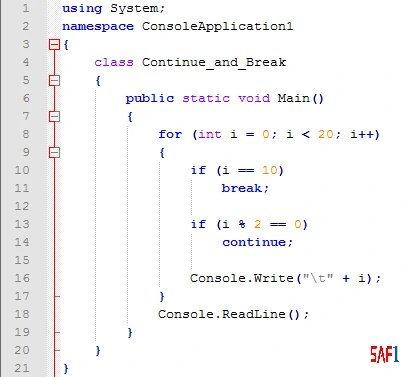
Ex: Write a program to print only odd numbers less than 10 using continue and break with for loop.
Explanation:
Line 8: We set the loop to start from 0 and continue as long as its boolean expression evaluates true.
Line 10 to 11: if the loop variable "i" is equal to 10 then the break statement will end the loop.
Line 13 to 14: if the loop variable "i" % 2 is equal to 0 i.e even number, the continue statement will cause the loop to skip the its current iteration.
Line 16: If the loop reach this line, then it will print out the number.
The output of this program will be:


صفوان الصلوي | Safwan Alselwi
A software engineer and an educational content creator interested in technology and programming languages. In my blogs, I convey my knowledge experience to those interested in the same field